Essential Settings To Speed Up Windows 7
The Microsoft has designed Windows 7 for proving better performance, fast processing than Windows xp and Windows vista. The laptops/desktops tends to slower as the time passes, its not the fault of Windows. Accumulation of junk in the system and execution of too many unneeded programs and services are the main reasons of this fault.
There are many ways to speed up your laptop computer, but let’s check out some of the most useful and important ways in which you can speed up your Windows 7 laptop.
Remove Spyware
Spyware and viruses are two of the biggest threats to any kind of computer as they can potentially corrupt files in a computer system which in turn makes the system unhealthy and prone to attacks by hackers. It is therefore important to save your device from these sort of risks which could also result in leakage of critical data from within your laptop computer. A useful way to do this is by using Microsoft security essentials to beef up your laptop’s security level and avoid intruders and all sort of viruses from gaining access to your system. Another useful tool is Windows malicious software removal tool which can scan your computer in order to check for the presence of any malicious items that may be present.
Free Up Disk Space
There are many clutter files which gets generated and are stored without intimation, so you need to identify those and need to clean them. Although manual deletion will not ensure that all clutter files are wiped out, with the help of some simple tools and tricks you can easily clear out clutter and all unwanted slugs from your laptop computer. A very easy example of how to free up disk space on your laptop includes the removal of temporary Internet files, deleting downloaded programs like Active X controls and Java applets, emptying the recycle bin, removing all error reports from the Windows 7 temporary log files and uninstalling programs that are not in use.
Speed Up Access To Data
With the help of disk defragmentation, you can easily improve the overall performance of your Windows 7 laptop system and manage system files that gets placed randomly on your hard disk. To do so, you need to run a tool called the disk defragmenter that easily re-arrange system files systematically after which the file indexing automatically becomes easier and simpler. Please note that if you have less than 15% free hard disk space, the disk defragmenter will not run. Running Disk Cleanup and Disk Defragmenter on a regular basis is a proven way of keeping laptop computers running quickly and efficiently. Its recommended that you perform this operation at least once every six months.
Detect/Repair Disk Error
Due to frequent use of the hard disk, it can potentially develop the bad sectors which slow down the overall speed of your computer. To further optimize the performance of the hard disk, you will therefore have to run error checking utility scans on the hard drive to check for bad sectors, scan for file system errors and check whether certain files or folders are misplaced. If you use your computer daily, you should run this utility once a week to help prevent any data loss. Many laptop users confuse fragmentation with formatting techniques however, disk defragmenting is a very safe process and does not lead to any deletion or modification of data.
Use a trusted Auto-protected Anti-Virus
Always ensure that you have a good anti-virus software to protect your laptop/computer against malware or spyware attack. Without such protection, there are chances of third party malware and virus being installed or stored on your system, causing harmful effects, decrease performance and also eating up precious hard drives space.
Install only Software which you need
Many of the users use some small size software for any specific reasons. If you use any trial software and unneeded then uninstall and delete it immediately. Else, they might hog precious disk space, RAM and processor cycles. If you’ve installed a software, which you are unable to get rid of, and which is hampering the normal functioning of your laptop, then you might have to format your hard drive. Be aware that formatting your hard drive might wipe out all your data. Therefore it is best you take a back-up before going ahead with formatting.
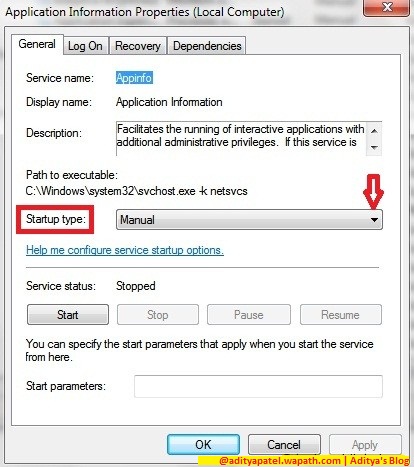
Disable or make unneeded services Manual
Some default processes and services, which might not really be necessary all time. They will consume RAM as well as the processor’s attention, slowing down other important tasks. So, disable all of such type unneeded process and services. For this, follow these steps:

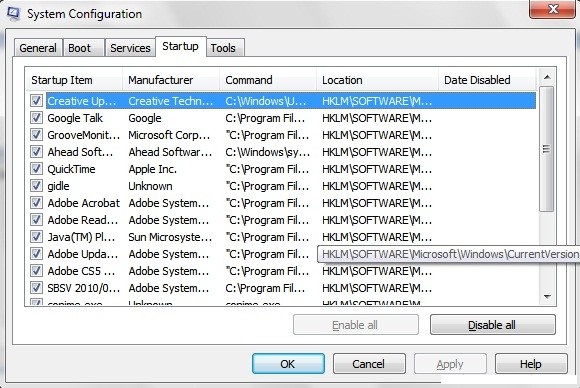
Disabling Unwanted Start-up programs to speed up System Start-up and Boot Time
Some programs are set to start during system start-up. These slow down the start-up process. Programs that are not really needed during start-up can be disabled. For this, Follow these steps:
Go to Start, type msconfig in the search box and press Enter.
Now select Startup tab.
Uncheck the box of all unnecessary programs to disable them.
Once you’ve disabled the processes, click Apply and OK.

Clean up the hard drive
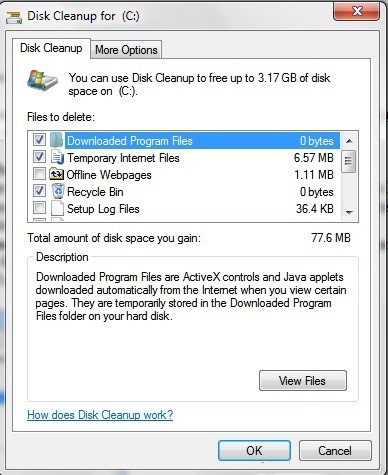
You could use Disk Cleanup option to remove unwanted files, like temp files, downloaded program files, recycle bin, etc, as follows:


Enable Write caching on device
This is an option which allows the OS to flush changed data to the hard disk when the system is idle, so that performance is not affected when in use. For enabling this, Follow these steps:
Perform Disk Defragmentation
When there is no sufficient space to store in a hard drive, the windows splits the file into parts and stores it in different areas on the hard drive. Defragmenting allows all these parts to be stored in contiguous memory locations. For defragmenting, follow these easy steps:
The Microsoft has designed Windows 7 for proving better performance, fast processing than Windows xp and Windows vista. The laptops/desktops tends to slower as the time passes, its not the fault of Windows. Accumulation of junk in the system and execution of too many unneeded programs and services are the main reasons of this fault.
There are many ways to speed up your laptop computer, but let’s check out some of the most useful and important ways in which you can speed up your Windows 7 laptop.
Remove Spyware
Spyware and viruses are two of the biggest threats to any kind of computer as they can potentially corrupt files in a computer system which in turn makes the system unhealthy and prone to attacks by hackers. It is therefore important to save your device from these sort of risks which could also result in leakage of critical data from within your laptop computer. A useful way to do this is by using Microsoft security essentials to beef up your laptop’s security level and avoid intruders and all sort of viruses from gaining access to your system. Another useful tool is Windows malicious software removal tool which can scan your computer in order to check for the presence of any malicious items that may be present.
Free Up Disk Space
There are many clutter files which gets generated and are stored without intimation, so you need to identify those and need to clean them. Although manual deletion will not ensure that all clutter files are wiped out, with the help of some simple tools and tricks you can easily clear out clutter and all unwanted slugs from your laptop computer. A very easy example of how to free up disk space on your laptop includes the removal of temporary Internet files, deleting downloaded programs like Active X controls and Java applets, emptying the recycle bin, removing all error reports from the Windows 7 temporary log files and uninstalling programs that are not in use.
Speed Up Access To Data
With the help of disk defragmentation, you can easily improve the overall performance of your Windows 7 laptop system and manage system files that gets placed randomly on your hard disk. To do so, you need to run a tool called the disk defragmenter that easily re-arrange system files systematically after which the file indexing automatically becomes easier and simpler. Please note that if you have less than 15% free hard disk space, the disk defragmenter will not run. Running Disk Cleanup and Disk Defragmenter on a regular basis is a proven way of keeping laptop computers running quickly and efficiently. Its recommended that you perform this operation at least once every six months.
Detect/Repair Disk Error
Due to frequent use of the hard disk, it can potentially develop the bad sectors which slow down the overall speed of your computer. To further optimize the performance of the hard disk, you will therefore have to run error checking utility scans on the hard drive to check for bad sectors, scan for file system errors and check whether certain files or folders are misplaced. If you use your computer daily, you should run this utility once a week to help prevent any data loss. Many laptop users confuse fragmentation with formatting techniques however, disk defragmenting is a very safe process and does not lead to any deletion or modification of data.
Use a trusted Auto-protected Anti-Virus
Always ensure that you have a good anti-virus software to protect your laptop/computer against malware or spyware attack. Without such protection, there are chances of third party malware and virus being installed or stored on your system, causing harmful effects, decrease performance and also eating up precious hard drives space.
Install only Software which you need
Many of the users use some small size software for any specific reasons. If you use any trial software and unneeded then uninstall and delete it immediately. Else, they might hog precious disk space, RAM and processor cycles. If you’ve installed a software, which you are unable to get rid of, and which is hampering the normal functioning of your laptop, then you might have to format your hard drive. Be aware that formatting your hard drive might wipe out all your data. Therefore it is best you take a back-up before going ahead with formatting.
Disable or make unneeded services Manual
Some default processes and services, which might not really be necessary all time. They will consume RAM as well as the processor’s attention, slowing down other important tasks. So, disable all of such type unneeded process and services. For this, follow these steps:
- Go to Start, type services.msc in the search box and press Enter
- Now right click on a service that you want to set to manual or disable. If the service is already started, Stop it first.
- After this, again right-click on it and select Properties.
- In the Startup type, you can either set the service to Manual, if you would be using it later, or Disable it, if not needed.

Disabling Unwanted Start-up programs to speed up System Start-up and Boot Time
Some programs are set to start during system start-up. These slow down the start-up process. Programs that are not really needed during start-up can be disabled. For this, Follow these steps:
Go to Start, type msconfig in the search box and press Enter.
Now select Startup tab.
Uncheck the box of all unnecessary programs to disable them.
Once you’ve disabled the processes, click Apply and OK.

Clean up the hard drive
You could use Disk Cleanup option to remove unwanted files, like temp files, downloaded program files, recycle bin, etc, as follows:
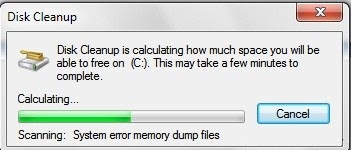
- Go to Start > All Programs > Accessories > System Tools > Disk Cleanup
- First, the system will calculate how much space can be freed up this way.
- In the Disk Cleanup window that appears, select the files in that need to be deleted under the Files to delete list.

- Now open More options tab for deleting ‘System Restore‘ and ‘Shadow copy‘ files.
- Finally click OK. You’ll be prompted again before the deletion. Click Yes.

Enable Write caching on device
This is an option which allows the OS to flush changed data to the hard disk when the system is idle, so that performance is not affected when in use. For enabling this, Follow these steps:
- Go to System Properties [ OR Press Windows + Pause/Break key ].
- Click on Device Manager in the left hand pane.
- Now expand Disk drives.
- Right-click on it and select Properties.
- Click the Policies tab in and check the box next to “Enable write caching on the device”
- You can as well check the box next to “Turn off Windows write-cache buffer flushing on the device” and then click OK.
 |
| Click To Enlarge |
- Note: However, there is one disadvantage in enabling these options – if there is a power outage or a system crash, data might be lost or corrupted.
Perform Disk Defragmentation
When there is no sufficient space to store in a hard drive, the windows splits the file into parts and stores it in different areas on the hard drive. Defragmenting allows all these parts to be stored in contiguous memory locations. For defragmenting, follow these easy steps:
- Click Start > All Programs > Accessories > System Tools > Disk Defragmenter.
- Now click on the drive that you want to defragment and then click Analyze disk.
- This will estimate the time required for the process. When done click on Defragment disk.
- Once done you can either View Report or click Close.


No comments:
Post a Comment
Thanks for the Comment.
I will get back to you soon.
Don't forget to subscribe to my blog feed by entering your email in the Subscribe box on the right sidebar.
Please Enter a Valid Email so that i can contact you.